Thank you for purchasing the
FLYINGnews template. If you have any questions that are beyond the scope of
this documentation, please feel free ask us at the themeforest.net comments
section. You can e-mail us at jaw(a)jawtemplates.com as well.
Table of Content
3.2 Blog and Categories Settings
10. Microdata in Google Search Results
1. Installing the theme
1.1 WordPress Requirements
The theme was tested in WordPress 3.4. However, we strongly recommend to always use the latest stable version of WordPress to ensure all known bugs and security fixes are addressed.
1.2 Server Requirements
The recommended minimum requirements are:
* PHP 5.2+
* MySQL 5+
* Apache 2.0 (2.2+ recommended)
* mod_mysql
* mod_xml
* mod_zlib
1.3 Browser Requirements
The back-end administration requirements of FLYINGnews admin panel in order of preference are as follows:
* Firefox 4+
* Safari 4+
* Google Chrome 3+
* Opera 9+
*
Internet Explorer 8+
NOTE: Internet Explorer 7 and Internet Explorer 8 have very slow
JavaScript implementations and are not recommended.
1.4 Installation procedure
Upload theme
IMPORTANT: Make sure you unzip the downloaded file from ThemeForest first (DON'T upload it to your server yet). This file contains the actual theme zip file called 'flyingnews.zip'. This is the theme file. Now, to install the theme follow one of these two methods:
1. Upload
the 'flyingnews.zip' file through the WordPress admin backend (This will ONLY
work if the server that hosts your website allows upload limits greater than 6
MB. Please note, the most hosting providers have only up to 2MB file upload
limit).
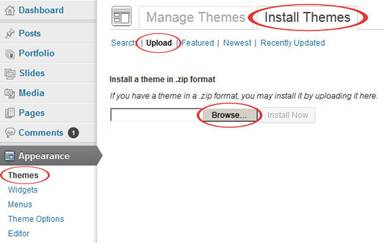
2. In case you prefer a direct access to your folders on the server, use this method. At first, unzip the flyingnews.zip and upload the extracted flyingnews/ folder to <wordpress install directory>/wp-content/themes/ using your FTP client so that the structure looks like:/wp-content/themes/flyingnews/.
1.4.2 Activate FLYINGnews theme
If the upload of theme was successful, you can see
FLYINGnews in list of the downloaded themes. You can activate it now.
1.4.2 Configure your theme options
To set up your theme, navigate to Appearance -> Theme
Options.
2. FLYINGnews settings
You can customize the overall functionality and look of the theme to your
needs.
2.1 General Settings
Here can be set up some of the most basic properties of your site. You can upload your own logo, favicon, choose the menu type, and enable or disable a Top Arrow icon as well.
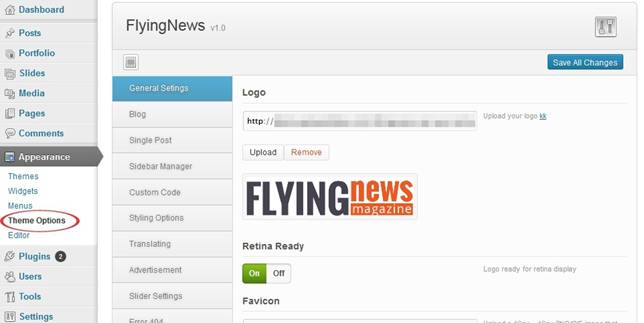
Logo
Click 'Upload' button to choose and upload your own logo.
Retina Ready
This option
allows the logo to be displayed in a high quality on the retina displays.
Notice: Recommended resolution of non retina ready logo is 261x61 px. If you prepare a retina ready logo, you should create it with double width and height, i. e. 522x122 px. Remember that if the 'Retina Ready' option is set on, your logo will be displayed in its half size on non retina displays, so it won't affect the actually displayed size). Make sure that you have set the switch off if you use a standard sized logo (261x61 px), otherwise it couses that the logo will be displayed too small on both of display types.
Favicon
Click 'Upload' button and upload your prepared 16px x 16px PNG/GIF image that will represent your website's favicon.
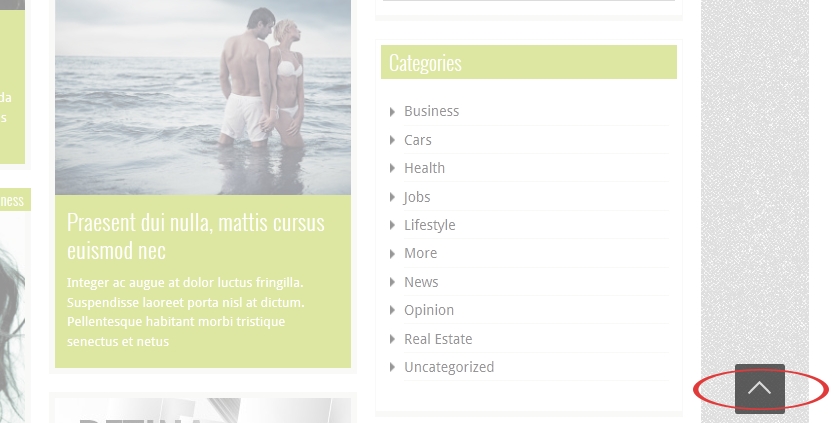
To Top Arrow
This is the small arrow on the right bottom corner which
links to the top of the page, it is useful mainly when the page is too long.
Here you can choose whether this arrow is available or not.
2.2 Blog
Blog Page Layout
Choose one of the available layouts for your blog page.
Include Category
Here you can choose the post categories from which the posts will display on your blog page. If you leave this field blank, all categories will be used.
Slider
Choose whether to display the slider or not.
Number of Posts
There are a few ways to load the posts with the attractive flying effect. Here you can determine the number of posts you would like to fetch in one of two consecutive batches or simply per page (it depends on the Pagination Style which you set). For a better understanding we recommend to set a small number of posts and try each of the presets available in the following option 'Pagination Style'.
Pagination Style
This option was
partly described in 'Number of Posts' section above. Choose the pagination
style you prefer.
ajax: Gets
the content in two consecutive batches of posts (their number is determined in Number of Posts above)
infinite: Allows the
consecutively automatic loading of all your posts in 'flying' batches when the
page is scrolling infinite with more: Performs the same, but not
automatically – a clicking on the 'more' link is required after each loaded
batch of posts.
none: Fetches just your
preset number of posts per page
number: gets the same result with the selectable page numbers bellow in
addition
wordpress: allows the standard Wordpress pagination style
Posts Order
Here you can choose the posts order way you prefer – ascending or descending.
Post Order by
Here you can choose the posts ordering by parametres.
Date: order by date
None: no order
ID: order by post ID
Author: order by author
Title: order by title
Modified: order by the last modified date
Parent: order by post parent IT
Rand: random order
Comment count: order by number of comments
Post Date Format
You can define the date format for your posts. Please click the attached link at this option to learn how to use the characters convention.
Hyperlink the Post Images
You can determine that the posts images
are hyperlinked as well as the titles are. If this option is set off, only
titles are linked to the whole posts.
Show Lightbox
You can choose whether to display lightbox after clicking on an image of post (Image, Video or Gallery type). Set the option on or off.
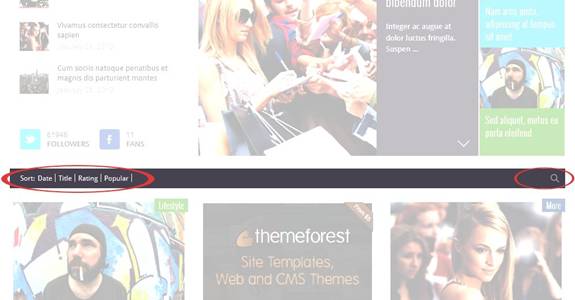
Search/Archive/Category Layout
Here you can choose one of the three preset layouts for your blog search, archive and category result page.
Search/Archive Right Sidebars
You can choose one of the sidebars which you have added in the Sidebar Manager section (see subchapter 2.4 Sidebar Manager).
Number of Words Excerpt
Here you can set a number of words to display in a preview content.
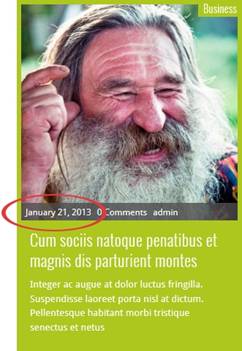
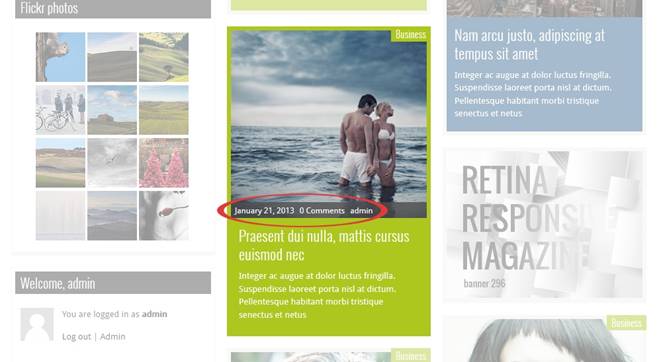
Author's Name
Use this switch to display or not the autor's name in a post.
Category Name
Use this switch to display or not a category name in a preview.
Meta Data
Here you can set up a various content to display in the meta data bar. Please see the explanations at the individual options in this settings section.
Main Bar
The Main Bar is the full width bar below the slider. These options give you a choice whether to display the Main Bar or not, and switch on or off its Sortion and Search options.
Facebook Comments
Here you can set up the Facebook Comments. Please follow the instructions at the individual options. The Facebook Comments switch gives you choice to toggle between wordpress and facebook comments. Number of Comments means the number of comments to display.
2.3 Single Post
Post Layout
There are three preset layouts for your post content. Here you can choose one of them.
Post Left/Right Sidebars
You can choose one of the sidebars, you have added in the Sidebar Manager section (see the next subchapter).
Share Post Bar
Choose whether to make a bar with the sharing options available or not below the post.
Sharing options
You can add icons of the most common social networks you want the post to be shared on to the Share Post Bar. Choose from Twitter, Facebook, Google, LinkedIn and Pinterest items.
2.4 Sidebar Manager
This is the place where you can add your optional sidebars. Fill in the Custom Sidebars field with a name you want and click the Add New Sidebar button. By the same way you can create all sidebars you need. Clicking a cross removes the chosen sidebar. Don't forget to save your changes. Notice that you find the created sidebars in the Widgets settings and can assign some widgets to them.

2.5 Custom Code
There are some fields for your CSS, javascript, and analytics codes, as well as the shortcodes for the footer text. Custom CSS allows you to implement your own styles in the selected preset (it will paste the inline css styles in code). Similarly the Custom Javascript allows you to implement the javascript. Paste your Google Analytics (or other) tracking code to the Google Analytics field to show the desired outputs in the footer of your theme. You can fill in the Footer Text field with your own plain or HTML tagged text.
2.6 Styling Options
Styling options allow you to easily change the whole look of your site.
Template Background Settings
Background Image:
Click 'Upload' button to upload your background image.
Background Texture: These boxes
allow you to choose a background texture. If you select the cross filled box,
no texture will be used.
Background Color: Pick a color from
the palette or enter a hex code.
Template Styling Settings
Template Main Color: You
can choose the color in which you would like to have the main elements. Choose
a color from the presets.
Template Custom Main Color: Here you
can choose the exact color you need. Colors can be inputted via the
colorchooser popup selector or manually using a hex code in the input field.
Template Link Color: This setting
provides the ability to easily change the color used to highlight links. Pick a
color from the palette or enter a hex code.
Template Link Hover Color: The Link
Hover Color setting provides the ability to easily change the color used to
highlight links. Pick a color from the palette or enter the hex code.
Title Font: Here you can change the
title font. This doesn't affect the font size, typeface and color remain
standard.
Paragraph Font: Here you can paste in your paragraph font name and choose a size, style,
and color from the dropdown lists. You also can choose the color using its hex
code.
2.7 Advertisement
FLYINGnews theme allows you to display and manage the banner ads on your web. You can use and configure your banner positions.
Banner Header 468x60
Switch on the Show
Banner to allow displaying the 468x60px banner. In the Banner Type
dropdown list you can choose whether you prefer an image banner or Google ads
type. The Banner Header 468x60 allows you to upload your 468x60px banner
(the field remains blank until you upload an image – at first, click 'Upload
Image' and choose the image file. After that the field will be filled with its
path). The Banner Header Image Link field allows you to insert your
banner link, Google Ads Code field lets you insert the Google ads code.

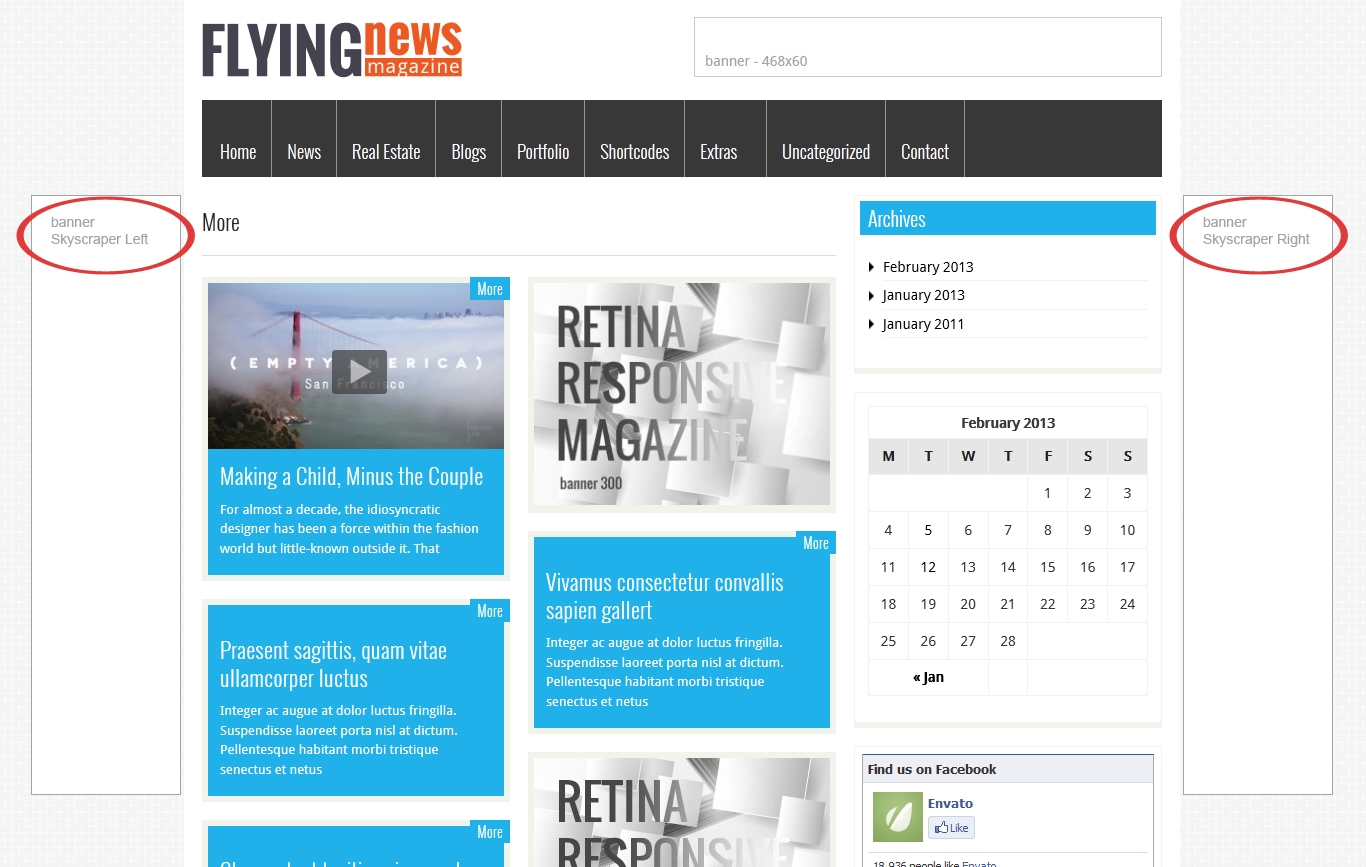
Banner – Skyscraper Right
This position was designed for a 'skyscrapper' banner placed on the right side of your page. Switch on the Show Banner to allow displaying the banner. The Banner – Skyscrapper allows you to upload your banner (the field remains blank until you upload an image – for details see 'Banner Header 468x60' description above). The Banner Header Image Link field allows you to insert your banner link, Google Ads Code field lets you insert the Google ads code.
Banner – Skyscraper Left
By the same way you can set up the 'skyscrapper' banner which will be placed on the left side of your page.
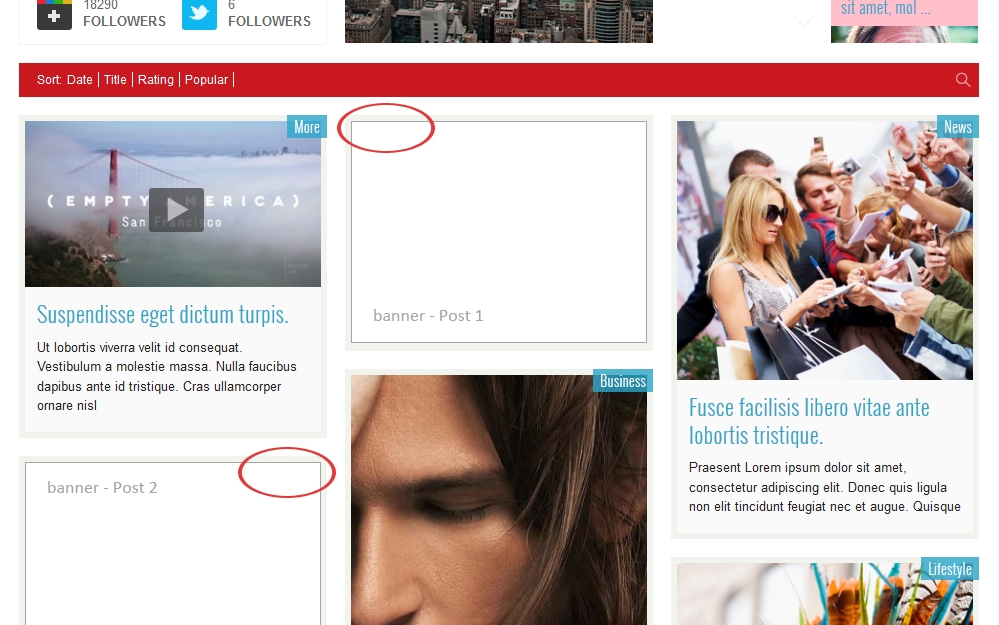
Banner – Post 1, Post 2, Post 3
These positions were designed to show some banners between
the 'flying' posts on the home page. Its placement is calculated according to
the number of posts. Note that no matter whether you have set the 'infinite' or
'infinite with more' pagination style in Blog
-> Pagination Style (for details see chapter 2.2 Blog – Pagination Style), these banners will be displayed only
in the first batch of the posts when you scroll the page.
Show Banner:
Choose whether the banner is displayed or not.
Banner Type: Choose whether you
prefer an image banner or Google ads type.
Banner – Post 1, Post 2, Post 3:
Upload your banner (the field remains blank until you upload an image – for
details see 'Banner Header 468x60' description above). It is recommended not to upload the image wider then
300 pixels.
Banner Link: Fill this field
with the banner link.
Google Ads Code: Insert the
Google Ads Code into this field. The required width of the Google
ads is 200 px or less.
Banner – Custom 1, Custom 2
You can define your two custom banners and add them to the position you want via 'Custom Banner &ndash J&W Widget' (see chapter 7. Widgets). There are the same options like for the Banners – Post 1, Post 2 and Post 3.
2.8 Slider Settings
Here you can set up your slider. Remember that only the posts and slides with a featured image will be shown in the slider.
Source
This option allows you to choose one from three preset content types for your slider (Last posts, Sticky posts, Slides). Select it from the dropdown list. Remember, that if the Sticky posts item has been chosen, your sticky posts are displayed in slider only (not in a content area).
Ø NOTE:If you choose the Sticky posts item but no posts have been marked as 'sticky', all posts are used.
Number of Slides
Fill in this field with a number of slides for showing.
Speed
Choose a speed of the slideshow – enter a value in miliseconds. The default value is 4000.
Length of Excerpt
This value means the number of characters you want to be displayed at the slides texts.
Direction of Scrolling
Allows you to choose whether your slider scrolls up or down.
Include Category
Click into the field/dropdown list to choose all categories which you want to fetch the posts from.
After you select all items you need, don't forget to save changes.
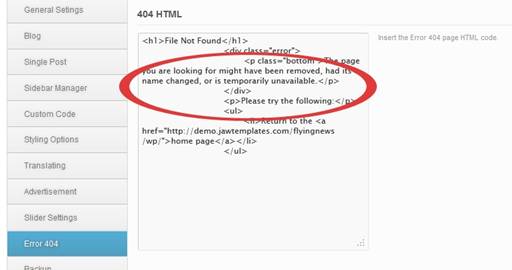
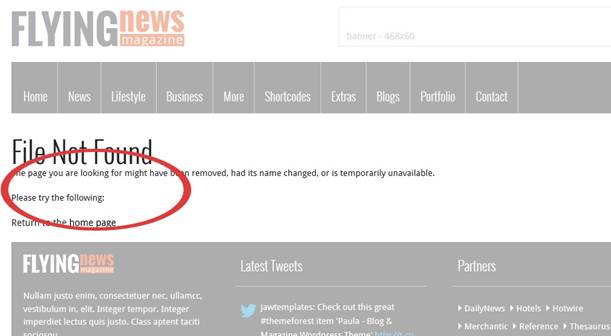
2.9 Error 404
Here you can create your own custom html 404 Page. Simply insert the HTML code you want to appear instead of common browser's page when the 404 error occurs.
![]()
2.10 Backup
Backup and Restore Options
Here you can backup your current options, and then restore it back at a later time. This is useful if you want to experiment on the options but would like to keep the old settings in case you need it back. Click the 'Backup Options' button to backup your current saved options in the Category, Menus and Theme Options. If you need to restore the options, click the 'Restore Options'. Please read carefully the warning message which will appear.
Transfer Theme Options Data
You also can transfer the entire saved Theme Options data between different installs by copying the text
inside the text box. To import data from another install, replace the data in
the text box with the one from another install and click Import Options.
Ø TIP: You can simply copy the data from the box to some txt file and keep it as backup.
2.11 Demo
In case you
would like to upload the sample data to make your website looks like our demo
(not like all its subpages!), click the thumbnail.
Ø
IMPORTANT: When uploading the demo content you may lose your data. Please don't
forget to back-up your database before you choose an option.
2.12
Advanced
There are a few special options which you can choose and set up for your page.
Notification of New Updates
If you want to be informed about new available updates, switch this option on.
Social Language
Here you can select the language of your choice for the social. Please visit the link beside this option to get the language codes list.
Facebook Comments
Comment Moderation
Area: If you are a moderator you will see notifications within
facebook.com. If you don't want to have moderator status or want to see all
comments in one area, use the link Comment Moderation Area.
App ID: You have to enter you
Facebook App ID to be able use the comment moderation area. To obtain this code
and set it up, please follow the steps below:
1. Visit https://developers.facebook.com/apps
2. Click 'Create New App'
3. Fill in App Name and click Continue (the Facebook App ID will be generated).
4. Select 'Website with Facebook Login' and fill in the url of your website
5. Copy App ID, go over to this theme settings and paste the code to the Facebook App ID field.
2.13 WooCommerce
If you have installed
the WooCommerce 2+ plugin, you can improve its integration with the FlyingNews theme.
Mix Products and Posts
If you turn on this
option and have set your home page as blog, some products will appear between posts.
You can choose these products in the „Show product“ item.
If you have
built your home page as a shop, there will be the latest posts mixed between your products.
Show Product
Here you can choose the products you want to be shown between your posts on the main page.
Product Page
Product Page Layout: This option allows you to choose one of three preset layouts for your product page, with a
sidebar on the left or on the right, or without it. If you choose one of the layouts with sidebar, the Product Right
Sidebars or Product Left Sidebars dropdown menu appears. Choose the sidebar item you prefer (please see
subchapter 2.4 Sidebar Manager and chapter 7. Widgets to learn how to set up and use the custom sidebars).
Display Nav Bar on Product Pages: Turn on this option if you want to display the nav bar in individual products.
Product Category
Product Category Layout: Here you can choose one of three preset layouts for your product category, with a sidebar
on the left or on the right, or without it. If you choose one of the layouts with sidebar, the Category Right Sidebars
or Category Left Sidebars dropdown menu appears. Choose the sidebar item you prefer (please see subchapter 2.4
Sidebar Manager and chapter 7. Widgets to learn how to set up and use the custom sidebars).
3. Pages
Here you can easily set up some special features of your pages. To create a new page navigate to Pages -> Add New. Now, you can see the mentioned options placed below the main content field. There are the same settings available for editing the pages you have already created (Pages -> All Pages).
Page Layout
This option allows you to choose one of three preset layouts for your page, with a sidebar on the left or on the right, or without it. If you choose one of the layouts with sidebar, the Blog Right Sidebars or Blog Left Sidebars dropdown menu appears. Choose the sidebar item you prefer (please see subchapter 2.4 Sidebar Manager and chapter 7. Widgets to learn how to set up and use the custom sidebars).
Page Name
You can allow a page name to be displayed in a preview. Simply choose on or off.

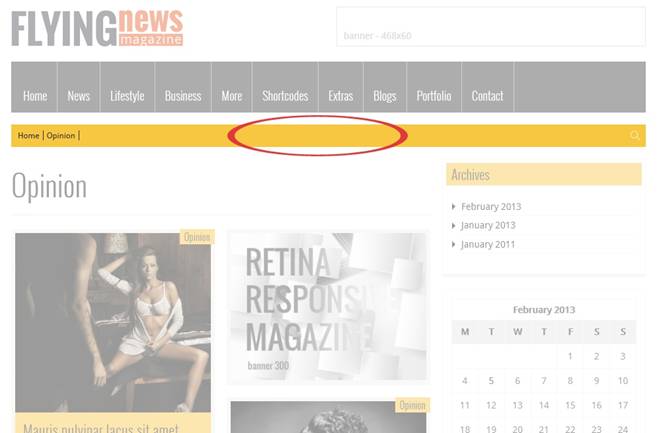
Breadcrumb Navigation Bar
Here you can choose whether you allow to display a breadcrumb navigation bar on your page or not.
Menu Background Color
Choose the color you want to use as a background color for the menu, filtering bar and breadcrumb navigation bar. If you select the first color box, the color will be taken from the main template settings. Choose the Custom Color box to use your custom menu background color selected in the option below.
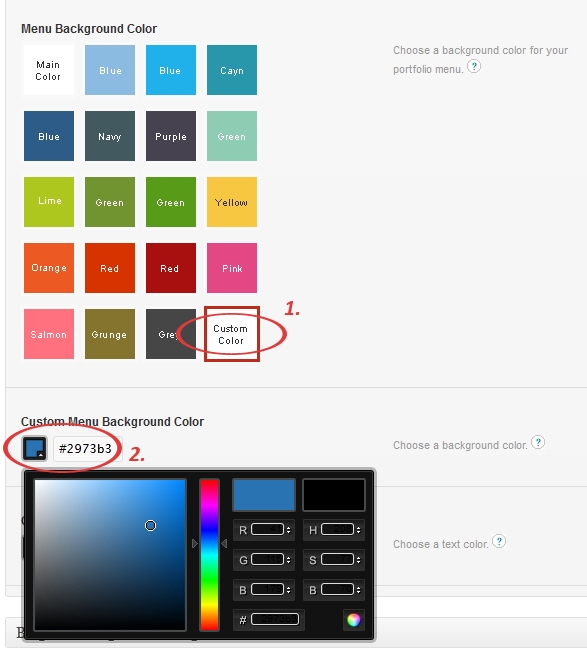
Custom Menu Background Color
Pick a color from the palette or enter a hex code to set a color for the elements described above.
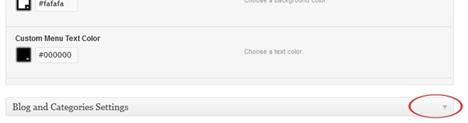
Custom Menu Text Color
Here you can choose a color of the menu text items.
3.2 Blog and Categories Settings
Drop down the lower Blog and Categories Settings bar to make the following settings available. Remember, that those options are available if Page Attributes -> Template is set to Blog or Category.
Include Category (optional)
Here you can choose the post categories from which the posts will display on your blog page. If you leave this field blank, all categories will be used.
Include Posts (optional)
Choose the posts you want to display. If you leave this field blank, all posts will be used.
Include Authors (optional)
Choose the authors whose posts you want to display. If you
leave this field blank, the posts from all authors will be used.
Ø NOTE: In case of using the Include Category, Include Posts and Include Authors options above, the AND operator is used (i. e. all of the chosen items are included in the displayed content).
There are a few ways to load posts with an attractive flying effect. Here you can determine the number of posts you would like to fetch in one of two consecutive batches or simply per page (it depends on the Pagination Style which you set). For a better understanding we recommend to set a small number of posts and try each of the presets available in the 'Pagination Style' option.
Number of Posts
Number of posts per page or per one batch of posts (their loading method depends on the Pagination Style below).
Pagination Style
This option was partly described in 'Number of Posts'
section above. Choose the pagination style you prefer.
ajax: Gets
the content in two consecutive batches of posts (their number is determined in Number of Posts).
infinite: Allows the
consecutively automatic loading of all your posts in 'flying' batches when the
page is scrolling. infinite with more: Performs the same, but not
automatically – a clicking on the 'more' link is required after each loaded
batch of posts.
none: Fetches just your
preset number of posts per page
number: gets the same result with the selectable page numbers bellow in
addition
wordpress: allows the standard WordPress pagination style.
Posts Order
Here you can choose the posts order way you prefer – ascending or descending.
Post Order by
Choose the parametres you want the posts to be ordered by.
Date: order by date
None: no order
ID: order by post ID
Author: order by author
Title: order by title
Modified: order by the last modified date
Parent: order by post parent IT
Rand: random order
Comment count: order by number of comments.
Post Date Format
Here you can define the date format for your posts. Please click the attached link at this option to learn how to use the characters convention.
Category Bar Content
You can choose whether the Main Bar in selected category offers the Breadcrumb or Sorting option.

Number of Words Excerpt
Here you can set a number of words to display in a preview content.
Hyperlink the Post Images
You can determine that the posts images
are hyperlinked as well as the titles are. If this option is set off, only
titles are linked to the whole posts.
Show Lightbox
You can choose whether to display lightbox after clicking on an image of post (Image, Video or Gallery type). Set the option on or off.
3.3 Blog Slider
Slider
Choose whether to enable slider for the blog page.
Slider Source
This option allows you to choose one from three preset content types for your slider (Last posts, Sticky posts, Slides). Select it from the dropdown list. Remember, that if the Sticky posts item has been chosen, your sticky posts are displayed in slider only (not in a content area).
Ø NOTE:If you choose the Sticky posts item but no posts have been marked as 'sticky', all posts are used.
Maximum Number of Posts in the Slider
Fill in the field with the maximum number of posts for showing in your slider. This value is used when the Slider option above has been switched on.
3.4 Meta Data
Here you can set up a various content to display in the meta data bar. Please see the explanations at the individual options in this settings section.
4. Posts
4.1 General Settings
Posts probably represent the most common content on your web. Here you can easily set up some special features for all your posts and for the each one of them. To create a new post navigate to Posts -> Add New. Now, you can see the mentioned options placed below the main content field. There are the same settings available for editing the posts you have already created (Pages -> All Pages).
Page Layout
This option allows you to choose one of the preset layouts
for your page, with a sidebar on the left or on the right, or without it.
Notice, that the 'Default Page Layout' option uses the Post Layout set in Theme
Options -> Single Post.
If you choose one of the layouts with sidebar, the Blog Right Sidebars or Blog Left Sidebars dropdown menu appears. Choose the sidebar item you prefer (please see subchapter 2.4 Sidebar Manager and chapter 7. Widgets to learn how to set up and use the custom sidebars).
Use Featured Image or Gallery or Video in post
You can choose whether to display a featured image or
gallery or video at the top of your post. If the switch is off, only the
possible images which you have put into the post content are shown.
Ø NOTE: An image is displayed always when the featured image has been set. A gallery is taken from the post if the Gallery post format has been set, a gallery is taken from the link when the Video post format has been set.
Breadcrumb Navigation Bar
Here you can choose whether you allow to display a
breadcrumb navigation bar on the top of your post or not.
4.2 Ratings Settings
Rating Title
This is a label text of your ratings box. Fill in the field with your version.
Rating Placement
Choose the ratings placement you prefer. It may be placed at the top or bottom of your post, or turned off.
Rating Criteria
Here you can set up user's and
your rating criteria. Click "Add" to make your (administrator's)
rating criteria options available and fill in the fields. The first value
represents your own rating (insert a number from 0 to 1 with a decimal point),
the second one is a number of ratings. Notice, that the users ratings values
are filled automatically, however you can
choose its style – stars or percentage.
![]()


Show Rating Description
Tick the option if you want to display your description in the ratings box.
Rating Description
This is the field which you can fill in with the text you want to be be displayed in the ratings box (in case the Show Rating Description option is ticked).
Overall Rating
Here you can choose whether you want to show an overall rating. If so, simply tick the option.
Overall Rating Type
There are the stars and percentage rating types available for your choice of the overall rating style. Simply choose the option you prefer.
Enable User Rating
Tick the option if you
want allow users to rate a post.
5. Categories
FLYINGnews theme gives you some extra options for your categories of posts. Navigate to Posts -> Categories and set up a new category you want, or choose any added one which you need to edit.
Category Color Scheme
Choose a color you want to use for the main graphic elements of selected category. It affects the images background, the category bar, as well as the background of chosen category's dropdown item and its subitems in the main menu. If you select the first color box, the color will be taken from the main template settings. Choose the Custom Color box to use your custom color selected in the option below.
Custom Category Color Scheme
Pick a color from the palette or enter a hex code to set a color for the elements described above. Remember, that the Custom Color item in the Category Color Scheme has to be chosen.
Custom Menu Text Color
Pick a color from the palette or enter a hex code to set a menu items color. Remember, that the Custom Color option in the Category Color Scheme has to be chosen.
Slider
Choose whether to enable slider for the category.
Slider Source
This option allows you to choose one from three preset content types for your slider (Last posts, Sticky posts, Slides). Select it from the dropdown list. Remember, that if the Sticky posts item has been chosen, your sticky posts are displayed in slider only (not in a content area).
Ø NOTE:If you choose the Sticky posts item but no posts have been marked as 'sticky', all posts are used.
Maximum Number of Posts in the Slider
Fill in the field with the maximum number of posts for showing in your slider. This value is used when the Slider option above has been switched on.
Category Bar
Here you can choose whether
a category bar (the bar below the main menu) is displayed or not.
Category Main Bar Content
You can choose whether the Main
Bar in selected category offers the Breadcrumb or Sorting option.
6. Shortcodes
WordPress Shortcodes are a simple set of functions for
creating macro codes to be used in post and page content. FLYINGnews theme
comes with a number of shortcodes allowing you to easily add styled content to
your site. Some of them allow you to completely redefine the post or page
content. Some shortcodes can embed files or create objects, some others can
change the layout of the content. Conveniently, the available shortcodes have
been included under the dropdown button in the WYSIWYG content editor which you
can use when you add or edit the Posts
or Pages.
Ø NOTE:
In case of the pair shortcodes
you always need to put the part of your content which you wish to be affected,
between the two bracketed code elements. Use the following syntax: [shortcode]Your text...[/shortcode].
Click the '[S]code button to open up a dropdown list of the available shortcodes and their settings.
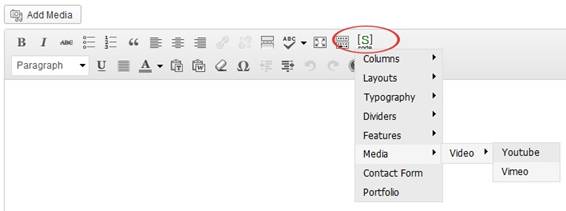
Columns: Choose this item if you want to wrap your
paragraph into some of the offered variants of columns.
Layouts: These shortcodes let you arrange your content to the various
layouts.
Typography: Here you find some typoghraphy tools such are blockquote,
button, highlight, notice, pre and code.
Divider: You can add a simple or styled divider into you content.
Features: This allows you to embed some objects like Google Maps,
iframes etc.
Media: You can embed Youtube or Vimeo video.
Contact Form: Simply set up and embed the contact form.
Porfolio: This shortcode allows you to simply set up and embed a whole
portfolio into your post or page.
7. Widgets
FLYINGnews theme gives you 7 custom widgets along with the standard widgets
included with Wordpress. You find them in Appearance
-> Widgets. Widgets can be placed into the Featured, Footer 1, Footer 2, Footer 3, as well as into all your
custom sidebar positions you have created in Theme Options -> Sidebar Manager section. Simply move the chosen
widget to the position you need by drag'n drop method. Then open the widget's
dropdown options and set up all you need.
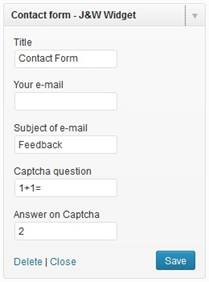
Contact Form – J&W Widget
Using this widget you can add the theme look-based contact form into the widget position you want. Drag it to the position you want and fill its fields with what you need.
Custom Banner – J&W Widget
This widget allows you to display one of your custom banners (see chapter 2.7 Advertisement Banner – Custom 1, Custom 2).
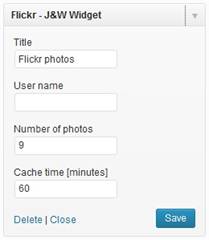
Flickr – J&W Widget
You can show your Flickr photos on your page using this widget. Fill in the fields with your values.
Login – J&W Widget
The theme-based login window. This widget has no options to set up.
Social – J&W Widget
Here you can simply add links to your social profiles at Google+, Twitter, Facebook, Youtube, Vimeo, as well as a link to RSS chanel.
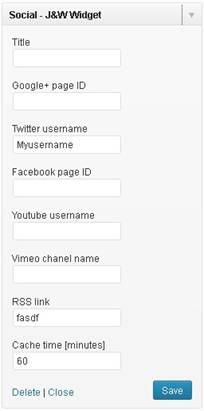
Ø
Advice to get the required IDs:
To access your Google Plus
Page ID follow these steps:
Log
in to your Google+ account.
2. Click on the "Page" Icon and select your page.
3. The string between the last slashes in URL which you can see in your
browser's address bar is the ID you need.
To get your Facebook Page ID:
Log into your Facebook and on the sidebar, search for "Pages"
and click.
2. On your "Pages", navigate to "Edit Page" on the right
hand side.
3. Go to your browser URL bar and copy your Page ID – the string displayed
after id?.
To get your Vimeo channel name:
Use the text string from the channel's URL (e.g. http://vimeo.com/channels/matvmovie)
Tab Posts – J&W Widget
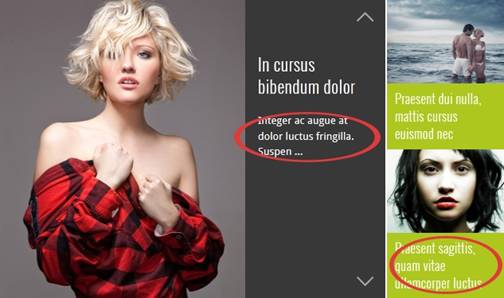
This widget allows you to set up a number and selection of popular and recent posts and comments previews, and a number of tags as well. This content is sorted to the tabs which labels you can (re)name in this widget too. The widget looks like that you can see at the following picture from our demo site.

Twitter – J&W Widget
This theme-based widget allows you to set up your latest
tweets from the Twitter. You can place it e.g. in a footer area. Simply fill in
your username and a number of tweets to show.
8. Slider
To manage the slides in slider go to Slides
-> Add New.
8.1 Upload images
You don't need to specially modify your images for slider, because they will be automatically resized and cropped to fit with it. However, we don't recommend to upload too large images since they take up too much space on a server.
Type a name of your picture into Add New Slide field, go to Feature Image box, click Set featured image and upload the image you want.
Slides Settings
Here you can set up some features of the slide that you are
creating.
Text Area: Fill
in this field with some text you want to show at the slider item.
Image Link: If you want an slide URL
to be different from the default insert the URL you need. This rewrites a
slides's link with the link you have entered.
Link Target: Define a link target.
Slider Background Color: Set a
background color for your slide. Choose the Custom
Color box to use your custom color selected in the option below.
Custom Background Color: Choose
a background color for your slide. Remember, that the Custom Color option in
the Slider Background Color has to be chosen.
Custom Text Color: Choose a text
color for your slide description. The Custom Color option in the Slider
Background Color has to be chosen.
9. Portfolio
At first create a category for your portfolio. Navigate to Portfolio -> Portfolio Categories and add your new category or
categories (e.g. Photography, Videography etc.).
Than go to Portfolio -> Add New. Here you create a portfolio item which type may be selected in the Type dropdown list below the content field.
Page Layout
Here you can choose one of the available layouts for your portfolio page.
Type
Choose the type of the portfolio post you need to create (Image, Video, Doc, Link) and set up the options which appear when you choose Video, Doc, or Link item.
Tick the Portfolio
Categories which you want the portfolio item to be associate with. If you
need, set the other options and click 'Preview' or 'Publish' button.
Ø REMEMBER: Never put an image to the content field
since it won't be shown. You have to add it and set up as Featured Image (the
option at the bottom right corner).
Ø TIP
for a video thumbnail: If you want
to use an thumbnail of your choice instead of that generated from your video
URL, you can set your own featured image for this video.
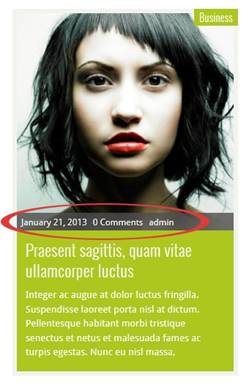
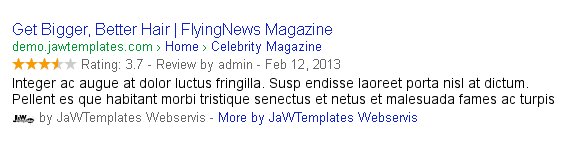
10. Microdata in Google Search Results
To correctly display the author in Google searching, set a Google+ URL in User profile in Wordpress administration (navigate to Users section), and add your web domain into the "Contributor To" section in your google+ profile settings. Then your post will be shown between google search results like you can see in the following picture.
11. Typography
Get inspired of some prestyled typography in our demo.
12. Sources and Credits
* Chosen
* jQuery
* jQuery Custom Forms Plugin 1.0
* jQuery gMap – Google Maps API V3
* jQuery Foundation Top Bar 2.0.1
* jQuery Foundation Tooltip Plugin 1.0.1
* Modernizr 2.5.2 (Custom Build) | MIT & BSD
* ingimage
* Theme Update Checker Library 1.2
* Widget Data – Setting Import/Export Plugin
* Widget Data – Setting Import/Export Plugin